This is the multi-page printable view of this section.
Click here to print.
Return to the regular view of this page.
Introduction
Here is where you can find all the information that you might need about the Heat Pump Challenge 2021, how you can take part, and what it involves.
If you have a specific question, or would like more information about the heat pump challenge you can contact us directly at info@carbon.coop
1 - What is the Heat Pump Challenge?
What is the purpose of heat pump challenge?
The Heat Pump Challenge 2021 is a citizen science and participative research and discovery project led by Carbon Co-op helping our member households currently on gas to engage with and understand how installing heat pumps will have an impact on their home.
Participants in the challenge will, in a limited way, simulate the operation of a heat pump replacing their gas boiler by turning down the temperature of hot water going to their radiators (emitters). This simulates how a heat pump would work with current heating systems as heat pumps generally operate at lower flow temperatures. It can also lead to improvements in the efficiency of some gas heating systems, particularly newer condensing boilers which operate more efficiently at lower temperatures. By doing this we hope to promote better understanding of how heating systems work and the changes that will need to be made to get them ready for heat pumps.
We will be closely monitoring the experience of people who are participating in the challenge and in some cases installing home environment monitors to gather detailed data on how our homes change over the course of the heating season.
For people taking part in the challenge as organised by Carbon Co-op we will provide incentives for active participation and engagement.
If you missed the application period you can still participate in the challenge by following the instructions on this website.
The challenge is intended to be open and participative. You can even suggest changes to this website by following the relevant links in the right side bar.
Whether you are ‘officially’ part of the challenge or not please get involved in discussion about it on our community forum and/or by messaging us on Twitter (https://twitter.com/carboncoop).
2 - When is the Challenge taking place?
More information about the dates and phases of the heat pump challenge
The heat pump challenge will take place over the current ‘heating season’, the period in which people typically use their heating. That means you can start now, and we will be finishing as the weather warms in the spring.
The challenge will be broken down into several phases, and during each phase we may ask you to do different things. The rough phases are outlined here:
Phase 1: End of November until early January // Setup and testing
During this phase we will be helping to get you set up with the challenge. We will not be recording any data, we may contact you directly to check that you are comfortable with the plans, have been able to adjust your boiler as necessary and not had any unexpected problems. In some cases we may contact you about installing temperature and humidity sensors around your home, so that in later phases we can better assess your home’s performance.
Phase 2: Mid January until Mid February // First evaluation run
During this phase we will ask you to keep a record of your experiences with the adjusted heating, and we may contact some of you directly to ask more specific questions about your home and heating. We may also send out a survey for you to complete.
Phase 3: Mid February until March // Second Tests
Based on the information collected during the first trial we may suggest some changes to the heating, and will have a further evaluation period where we pay close attention to your experience and make further surveys. This period will run until the end of the heating season - most likely mid March.
3 - Phase 1: Test Phase (December 2021)
What does it mean to take part in the Heat Pump Challenge?
If you have filled in our registration form then you have already taken the first step in the Heat Pump Challenge. By applying and letting us know some basic information about your home heating system we are putting together the first pieces in the puzzle.
There are just a few easy steps to get you started with the challenge:
1. Sign up to PowerShaper Monitor
If you have a smart meter and have not yet joined PowerShaper Monitor now is the time to do so! This service is free for Carbon Co-op members (or £12 a year otherwise) and is a great way to track your home energy use and domestic carbon emissions. You can read more about the service at PowerShaper.io. By connecting your smart meter to our system not only will you be able to view your home energy use, but we will be able to better evaluate the impact of this challenge on home energy use. Don’t worry if you don’t have a smart meter, or are unable to connect to PowerShaper Monitor, you can still take part in the challenge, we just won’t be able to get that extra bit of accuracy.
2. Adjust your boiler flow temperature
To start with you need to try to adjust the radiator flow temperature on your boiler. During the test phase we would like you to try reducing this to 60C. At this temperature you are unlikely to have any issues bringing your home up to a comfortable temperature but it may take slightly longer than normal (for those with newer condensing boilers this actually is often the temperature at which they are designed to operate!).
Adjusting your boiler can be intimidating, but these changes are safe and easy. We have created some rough guides about how it might work, but if you are still struggling, just send us an email and we can help you through the process.
PLEASE NOTE: If your have a hot water tank/cylinder and your boiler does not have the ability to separately adjust your radiator flow temperature and the temperature of hot water sent to the tank then unfortunately you will not be able to participate in the challenge. This is because the water in your tank needs to be heated to at least 60C to prevent the formation of legionella bacteria which can be harmful to your health. If you do not have a hot water tank then this is not an issue as the water is heated instantly and not stored before going to your taps (so there is no opportunity for legionella bacteria to form).
3. Adjust your radiators
If you have TRV (Thermostatic Radiator Valves) installed on your radiators you can skip this step! If you are not sure if TRV’s are installed, here is how you can find out.
Otherwise, if you do not have TRVs installed on some of your radiators, then we advise that you fully open all radiator valves (turn them up to the max). You will then likely need to adjust these valves to ensure a comfortable temperature.
4 - Phase 2: Evaluation run (January 2022)
Reducing flow temperature to within heat pump range
We’ve had a brilliant response so far, with over over 95% of survey respondents able to reduce the flow temperature on their boiler to 60°C during the testing phase. Most participants reduced their flow temperature by between 5-25°C we should see some significant efficiency gains and are interested to see what impact this will have on gas usage. Thank you so much to everyone who has fed back so far, it’s all really useful learning. So now is the time for Phase 2, which will be a little more challenging.
1. Tell us about your experience in the testing phase
Most of you have already responded to the survey we sent out at the end of last year, many thanks if that includes you. If you’ve not yet had time to fill out your experiences, you can still complete the testing phase survey here.
2. Adjust your flow temperature
In phase 2 we would like you to try reducing your flow temperature all the way down to 50°C. At this temperature you may have problems reaching your desired temperature, particularly if you live in an older property, but we have chosen this level as it is within the operating range of a standard heat pump. It will take longer for your home to reach temperature when the heating first comes on and you may find it necessary to adjust your heating periods to account for this.
If you find 50°C isn’t sufficient to get your home up to desire temperature, you should increase your flow temperature to 55°C. Feel free to fallback to 60°C or above if youn need to, the aim is to find the most efficient (lowest) temperature you can run your boiler at while still keeping your home cosy.
PLEASE NOTE: If your have a hot water tank/cylinder and your boiler does not have the ability to separately adjust your radiator flow temperature and the temperature of hot water sent to the tank then unfortunately you will not be able to participate in the challenge. If you have seperate controls but have any concern that changes made to your flow temperature have made an impact on your hot water temperature, you should NOT make reductions below 60°C. It is vital to ensure the water in your tank is heated to at least 60°C, as per HSE guidelines, to prevent the formation of legionella bacteria which can be harmful to your health.
3. Keep a record of your changes
We’re interested in the impact flow temperatures have on comfort levels around the home and also on gas consumption. It is useful for us to have an idea when flow temperatures were changed, any other changes you made to your heating system setup and any impact you noted e.g was it warmer or colder in particular parts of your home, was there a particular day the boiler seemed to struggle to deliver your usual room temperature?
For people who’ve been successful in connecting their smart meters to PowerShaper Monitor, we aim to plot energy usage against local weather data to assess what impact flow temperature reductions has had on your gas usage.
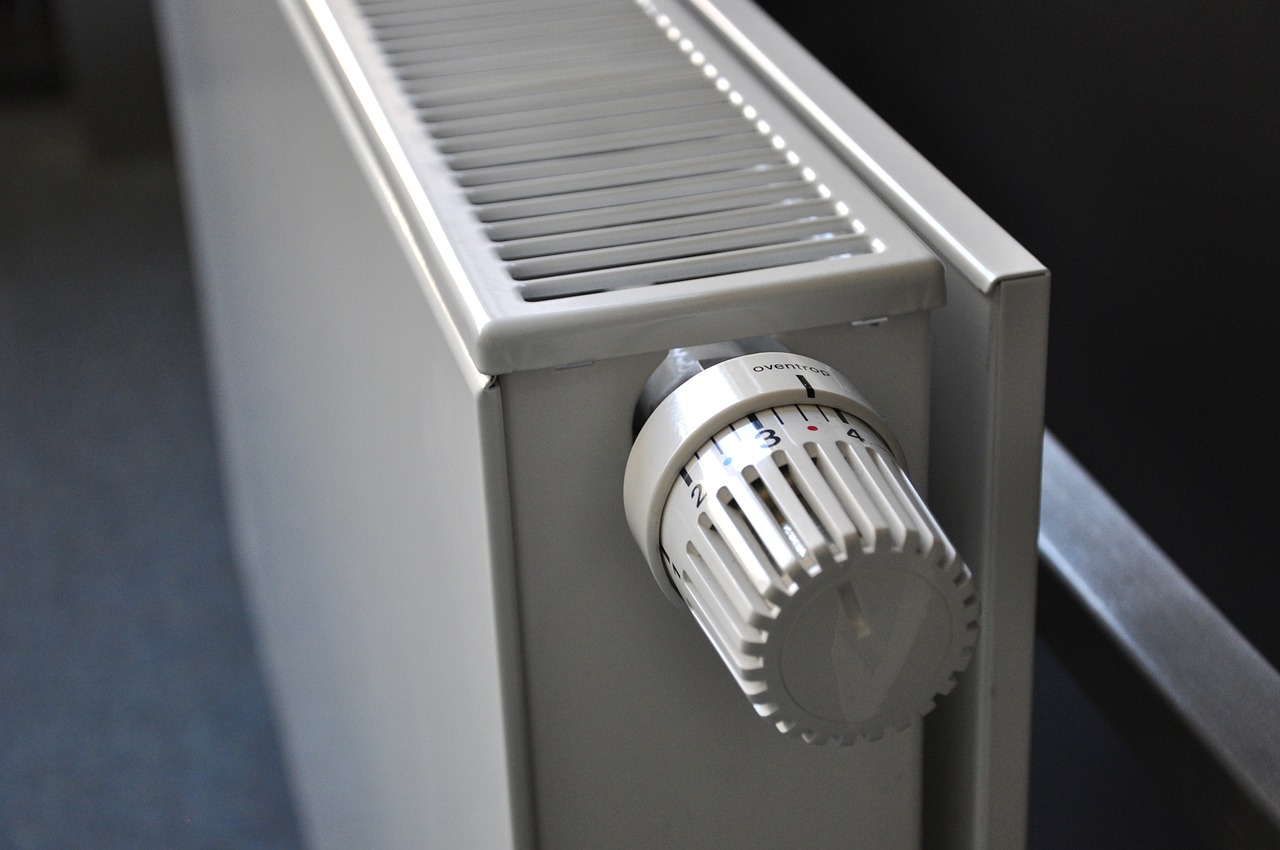
5 - How do I adjust my flow temperature?
General tips and information about adjusting your boiler flow temperature
There are a few different ways you might be able to adjust the flow temperature on your boiler and it will depend on the manufacturer and model. You may be able to find the specific user manual for your boiler, with instructions on changing the flow temperature on this site. We would always recommend you refer to your operating manual, but here are some of the general methods that are often used.
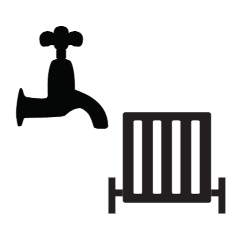
A key thing to look for with your boiler is the radiator symbol and the tap symbol. Usually the radiator symbol denotes flow temperature whereas the tap symbol marks the domestic hot water (DHW) settings. For our purposes we do not want to adjust the DHW and instead only change the flow temperature for the heating. See these examples below:
Differences between system and combi boilers
There are two main types of gas heating system in use in UK - system and combi - which relates to how hot water is supplied to outlets in home. Boilers for both types look very similar or are visually identical.
System type supply hot water to a cylinder/tank which then supplies hot water to outlets. These are more common in older and / or larger properties with larger numbers of hot water outlets (taps/showers)/more people.
Combi type supply hot water directly from the gas boiler. These are more common in smaller and / or newer properties with smaller numbers of outlets/less people.
IMPORTANT If you have a system type it is important you dont reduce your DHW below 60°C. This is important to prevent the growth of legionella bacteria in your tank.
If you have a system type boiler it may not be possible to control your DHW temperature separately to your radiator flow temperature, in this case regretabbly you may not be able to fully participate in the heat pump challenge (however you could get down to 60C which may still be a reduction).
Boiler Controls Type 1: Manual dials, separate hot water and heating with digital temperature display
Some boilers have two dials on the front to separately control the hot water and space/flow heating temperatures. You may instead have a single dial with the radiator symbol which will work the same way.

The dial with a radiator like symbol (left in the above image) will control the temperature of the heating whilst the right will control the hot water temperature.
As you turn the relevant dial the temperature on the digital display may change indicating the new setting.
Boiler Controls Type 2: Manual dials only, with number scale
Some boilers may have a numbered dial like below, for these boilers if changing the dial does not change the temperature displayed on the digital display, or there is no digital display it may be worth checking your boiler user manual since some models (in particular Worcester Bosch Greenstar boilers) include a table outlining corresponding temperatures to the numbers on the dial.
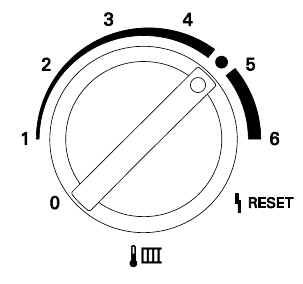
With boilers where you have manual dials, and a digital display, but the change in temperature is not displayed as the dial is turned, you may still be able to figure out what temperature it is set to by observing the display when the heating is on and making adjustments as necessary.
If there is no temperature table in the user manual it may not be possible to identify the flow temperature of the boiler without additional external temperature sensors. In such a case please contact us at info@carbon.coop to see if it is possible for us to recommend or supply such sensors.
Boiler Controls Type 3: Manual dial only, without number scale
Some boilers will have manual controls for separate control of the flow temperature and domestic water heating temperatyre, but will have no number scale on the controls and no corresponding digital temperature display.
In general, and depending on the model of the boiler the temperature will be adjustable between ~25°C-85°C using these controls. For the purposes of the challenge we want to be around 50-55°C.
It can be very difficult to accurately determine the flow temperature in this case without the use of additonal temperature sensors. We may be able to supply or reccomend such sensors, in which case please contact us at: info@carbon.coop.
Boiler Controls Type 4: Digital interface
Digital interfaces on boilers can vary significantly however, there are a few key things which you can look for.
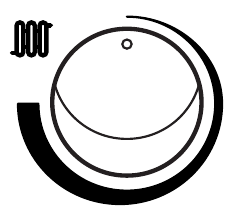
First you will need to select the flow temperature function, this is usually indicated by the radiator symbol which will look a bit like one of the icons below:
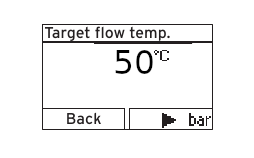
After that it is a case of adjusting the target flow temperature to the desired level, often this is done using the down arrow button, or a dial.
Boiler Controls Type 5: Single manual dial, no clear seperate controls for flow temperature
Some boilers may have a manual dial, which may be numbered or even have temperatures marked on it, but does not provide a clear separation of the radiator flow temperature (usually marked with a radiator symbol) and domestic how water temperature (DHW - usually marked with a tap symbol).
In this case it is important to ensure that you do not reduce you DHW temperature below 60°C which is the minimum temperature required in order to kill legionella bacteria.
It may be possible to test if this is a separate flow temperature control or a combined DHW and heating control by temporarily turning the dial to the minimum and running the hot water tap, ensuring the temperature has not been reduced from the usual >60°C.
Boiler Controls Type 6: Flow temp control from external device (likely via OpenTherm control) as part of load/weather compensation
It is possible to control flow temperatures from an external device connected to the boiler where this supports the OpenTherm protocol used for intercommunication with heating systems. An example of such a device is the Nest Thermostat 3rd Gen or E paired with a boiler that supports this (a feature Nest call ‘True Radiant’). In this case your OpenTherm enabled thermostat is already regulating flow temperatures to improve the performance of the boiler and your comfort and manually adjusting the flow temperatures from the boiler may not have any effect. For some boilers it is still possible to influence the behaviour in this case by setting a max flow temperature on the boiler itself. Please contact us if you would like to try and participate in the challenge and we can offer more tailored advice in this case.
Boiler Controls Type 7: Weather compensation integrated into boiler
Some boilers (e.g. Viessmann Vitocal 200) offer weather compensation integrated into the boiler and facilitated by the installation of an external temperature sensor. This will typically involve setting a heating curve which calibrates the flow temperature to the outside temperature. If you have never changed these settings you may find that the maximum flow temperature has been set to quite a high value in which case there would be a similar benefit to reducing this. This is effectively like manually changing your flow temperature as the weather changes except in this case you are programming this into the boiler so that you do not need to remember to do it. Please contact us if you would like to try and participate in the challenge and we can offer more tailored advice in this case.
6 - How do I know if I have TRVs?
Some simple steps to identify if you have TRVs in your home
Thermostatic Radiator Valves or TRVs are used to control the temperature of a room by automatically adjusting the hot water coming into a radiator. For the Heat Pump Challenge, TRVs are great, because they mean that your radiators will automatically be adjusted accounting for the lower flow temperature.
Finding out if your radiator has TRVs can be tricky, and many people are unaware that the even have them, so how can you tell?
Most thermostatic radiator valves have number marks from 1 - 5 but some have a screen and buttons. If you have noticed a snowflake or ‘defrost’ symbol (❄) this is also an indicator that you have a TRV fitted. Generally TRVs can be removed from the radiator by unscrewing with your hands, and do not require any tools (we do not suggest removing them!). In contrast, manual radiator valves do not have numbered marks, instead generally having a plus (+) and minus (-) and cannot be removed from the radiator without tools.
7 - Useful resources
Some resources that we have found useful or that others have suggested.
Some useful resources we have collected or which have been suggested. Will update as we go along.